Seal-Wrap is an efficient method for the replacement or repair of casing end seals that are either damaged or are being installed due to new construction.
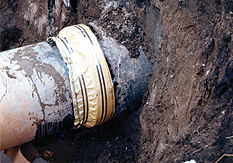
Seal-Wrap™ is a casing end-seal wrapper consisting of a heavy woven glass coated with a butyl mastic of high dielectric quality wrapped around the end of the casing and on the carrier pipe. It is then strapped in place with stainless steel banding.
End Use
The Seal-Wrap system was designed by the Trenton Corporation to enable field personnel to readily replace existing “rubber-boot” type end seals that are damaged prior to installation of casing filler. Seal-Wrap can also be used to reinforce existing “boot” or “compression” type seals. This system also has advantages for new construction applications. Seal-Wrap is a simple, efficient method of sealing the annular space between pipe and casing that does not necessitate absolute centering of the pipe in the casing.
Application Procedures
With a wire brush, clean the last 12” of the casing pipe ends and the first 12” of the carrier pipe to remove loose rust, loose coating, and dirt. Dry off all surfaces.
Brush Seal-Wrap Primer onto the cleaned areas of the carrier and casing to be covered with Seal-Wrap. Let dry until tacky.
Place one layer of Double-Faced Adhesive at the edge of the casing and one layer approximately 4” from the end of the casing on the carrier pipe. Remove release paper from the Double-Faced Adhesive. This is the area where the banding will be applied.
Measure around outside circumference of the casing to determine length for a single wrap of Seal-Wrap, then add 6″ to ensure that Seal-Wrap is cut long enough to allow for a 6″ overlap. Apply one wrap of Seal-Wrap around the carrier and casing end. One edge of the Seal-Wrap should be aligned with the farthest edge of the Double-Faced Adhesive on the casing. Remove release paper as you apply the Seal-Wrap.
Band securely in place, using one band and two buckles on both casing and carrier in the middle of the Double-Faced Adhesive. Use the banding tool to tighten bands until flush with the surface of the Seal-Wrap, then tighten both buckles with the supplied hexagonal wrench.
Cover buckles with small squares (approx. 6” square) of Double-Faced Adhesive to prevent cutting of next layer. Remove release paper from Double-Faced Adhesive.
Apply a continuous double wrap of Seal-Wrap directly over the first wrap, making sure to start the second wrap in a different position than the first. Remove release paper as you apply the Seal-Wrap. (To determine the length of Seal-Wrap, double the casing circumference, then add 6” for overlap.)
Apply one wrap of Double-Faced Adhesive centered over the edge of the casing end and one wrap centered over the edge where the Seal-Wrap meets the carrier pipe. Do not remove release paper from the Double-Faced Adhesive.
Place two bands on the carrier pipe on either side of the first band. The band closest to the end of the casing should be over the Double-Faced Adhesive applied in Step 8.
Place two bands on the casing pipe on either side of the first band. The band closest to the end of the casing should be over the Double-Faced Adhesive applied in Step 8.
Tighten all bands into place so they seat securely into the Double-Faced Adhesive and Seal-Wrap.
Let the seals cure overnight.
Apply up to 2 psi into top vent, then check for a strong airflow escaping out the lower end vent. This confirms there are no restrictions between vents.
Close off the lower end vent, pressure casing to up to 2 psi, and monitor for 15 minutes. If any air pressure holds, the test is complete and the casing is prepared. It is highly recommended to backfill before testing above 2 psi.
If air pressure slowly declines, due to a slow air leak, that is not a problem. The casing fill material is viscous and will plug a small leak when the casing is filled.
If casing is to be filled with wax, it is highly recommended and even critical that the ends of the casing are backfilled prior to filling. The backfill will help support the seals, stop any minor leaks, and greatly lessen the unlikely possibility of the end seals sliding off the casing when the filler applies pressure.
Advantages
Carrier does not have to be centered in the casing.